As I can't move on with two projects and the other is a slow crawl, I am looking to move on to the next one. However, I hate having unfinished kits around as they invariably get damaged and discarded.
So that is why I am sitting here not modelling for the time being.
I am tempted to start on the Airfix Buccaneer.
Watch this space
Wednesday, December 14, 2011
In the doldrums - again!
I appear to have hit a block at the moment. Having had a big burst of enthusiasm last month, it has all come to a halt.
Current state of play:
Special Secret Project
I messed up some decals (again!!) but instead of buying a new kit, I have asked Revell to send me a new set. I thought that this would come from the UK quite quickly but Revell tell me the sheet is coming from Germany and might take 6 weeks! That's messed up my Xmas present idea :-(
AZ Models Supermarine Attacker.
When I took the masking tape off the Sky, I managed to shear one of the wings off as well. It didn't go on the glue join, it was the actual plastic that sheared! I have sorted that and touched up the pain to it is now ready for decals.


Decals - ah, yes. On the original decal sheet that came with the kit, there are two decals that go near to the jet intake on either side. What the decals say is "Keep Wheel All From Intake While Engine Is Running"! I bought a new set of ModelDecal decals to use - but I cannot find them! Hence this is on hold until they turn up.
Resin Gannet
I am working on the wing fold but am not finding this easy to sort out. There are no realistic mounting points as the detailing is so accurate, nothing is strong enough to do the job. Plus, as there are three components, it is difficult to get the angles right. This is what a Gannet looks like with its wings folded.
and here is a video of of the only flying Fairey Gannet - a T% based in the USA showing the wing fold in operation. It's a bit blurred but you will get the idea.
Fairey Gannet T5
So - What to do?
For the Gannet, I am thinking of drilling some holes between the parts and putting some brass wire through. I will then bend every thing to the right angle and hopefully the brass wire will give it all some strength. I will have to make good on the wing surfaces which rather relies on me still having some of the paint mix I used for the RAF Blue Grey but onwards and upwards!
Tuesday, November 22, 2011
Wrap up on the Avenger and progress on others
The Avenger is finished. It has had its final satin coat of varnish.
Last details
Radio aerials are Aeroclub stretchy thread with a sweep of dark blue on it. I drilled a couple of holes and put 0.2mm brass wire in to set the attachment points.
The canopy was lined out using the technique described in an earlier blog - clear decal painted up and Kleared. I didn't cut it thin enough so it looks a little bulky but it worked a treat - especially on a complicated canopy like this one.


AZ Models Attacker
This is an interesting build. The moulds are short run and are quite nicely presented in terms of panel lines etc. Its just that everything needs that bit of fettling to make the parts fit together. Still that's the fun of a short run kit.
I have got it to the point where it has had the underneath and sides done in Sky and I have masked it up ready for the top coat of EDSG.

CMR COD Gannet
After painting it up with Xtracolor RAF Blue Grey, I felt that it didn't look any different from Gloss Sea Blue. Plus I was not happy using enamels after all these years. So, after due warning from Ken that I would have some problems, I gave it a coat of Vallejo Polyurethane White and then mixed up some Gloss Sea Blue and some XA1139 Light Grey to a blend that looked right to me and the swatches I was seeing on the web. I am quite happy with the result. I did manage to save some of the mix for touching up - amazing that I remembered to do that!

This has now had a coat of Klear and is ready for some decalling.
Thursday, November 17, 2011
New Canopy Framing process
This has been passed onto me by my friend Ken. here goes -
Start off with a sheet of clear decal paper.
1. Give it a coat of Future/Klear/Pledge MSW (referred to as Klear from now on).
2. Spray it with the interior colour of the framing.
3. Spray it with the exterior colour of the aircraft.
4. Give it another coat of Klear.
5. Trim it into strips of appropriate thickness.
6. Apply the decal in the normal way.
I am actually going to apply the decal onto a wet layer of Klear rather than using MSSET.
This will take place on my Avenger in the next couple of days so - Watch This Space!
The RN Avenger AS-4 is close to being finished - and no dramas
The following is the Academy Avenger, with small modifications to the body - namely replacing the bulged windows with flat ones and the removal of another small window on either side, which can be made to look like a 1950's RN Avenger. The big addition, however, is the ASH radar under the starboard wing.
I picked up the Quickboost ASH radar resin part but this does not come with any mounting point. This is because this item was fitted to a range of aircraft in differing positions so a single mount would not be appropriate. Using a photo I had to hand of an AS-4 at the time of Suez, I was able to calculate the size and cut out a plastic card version of the mount.
All that is left to do is to give the model as it exists a coat of satin varnish, paint the framing on the canopy and put it all together. A couple of comments here - 1. I am using satin varnish as the consensus seems to be that gloss is too bright for 1/72. I will make my mind up when I see the final version - and 2. I am using a new technique to frame the canopy which I will describe in theory in the next Blog entry and then report on the practice later.


Proof of time travel
Here is the background and then my theory.
Often when you are modelling, you drop a part on the floor - well I do it all the time!
I am sure that you have all observed that to go looking for a small part immediately is often a waste of time. Give it a few minutes and there it is. Now, my wife has theories about this, mostly to do with impatience and incompetent looking.
My theory is this. We can prove the existence of time travel by the process described above. What actually happens is that, by falling off the table - along with the plastic content of the part, the likelihood of being able to replace it if lost, and the correlation of the plastic colour with that of the floor covering - the part will actually disappear - albeit, just a few minutes but none the less disappear. This is proven by the fact that the part will not be visible for that few minutes.
My theory is that the part is actually travelling through time and will just re-appear once we catch up with it. There can be no other rationalisation!
QED!
The Seafire 46 is finished BUT!
I have finished the Admiral Seafire 46 with a single exception - I can't find the canopy! Why is there always something that goes wrong?
However, I am going to beg the big H, on my next wholesale order, for a replacement. Maybe they will and maybe they won't. I am not keen on buying a whole new kit just for the canopy. I have one other game plan ready - wait a couple of weeks and it may turn up. I will post a blog entry about my time travel theories and how model making proves that it exists.
Anyway, here it is. I have to say that, in spite of some of the problems, like losing the undercarriage doors and the tail wheel, I quite enjoyed making this kit. I don't think it looks too bad.
(Don't forget, you can see a bigger version of each photo by double clicking - a pop up window will open)


Sunday, November 13, 2011
Undercarriage door replacement
I managed to lose three of the undercarriage doors so I have to make some replacements.
The door attached to the port undercarriage strut was easy because I had the starboard one to use as a template. The two outer doors were a different matter because I have lost both of them!
Photoshop to the rescue. On the back of the box, there is a drawing of the underneath to show decal placement. It has the outline of the doors drawn in. However, it is not to scale.
I scanned the box into Photoshop and measured the box wing dimension and the model dimension. I determined that the box art had to be scaled by 175.61%to get it to the size of the model.
Here is the before and after. Making the doors should now be easy.

Saturday, November 05, 2011
The Gannet gets its first coat of primer
As CODs were painted in a dark grey blue, I have given the fuselage and the wings a first coat of my favourite primer - Vallejo Polyurethane Black. As usual, this has brought out th areas where the filling might not be as good as it should be.
Some great news though. In looking up the aircraft as supplied in the CMR kit, I find that the COD Gannet that is depicted in the kit was actually flown by my old scouting contact - John Sillett. It seems that he had a panel blow off whilst flying it. This means that, given that the Alley Cat decals have one of his AEW3s on the sheet, I will end up making models of two aircraft that he flew. Not a bad tally given that he is only recorded as flying 5 Gannets in total.
Here are the pics of the current state of play. As you can see, with total disregard to my sanity, I have gone for the wing fold option!


Guess I need to do a bit more work in this seam!

These are the rest of the wing fold. As the middle parts will have some decals on, these all have to be painted and decalled before I can put the wing fold together.
Friday, November 04, 2011
A little bit of filler goes a long way!
I have put the two fuselage halves of the Gannet together. Unfortunately, I have got the cockpit sitting a bit wrong so the Navigator's seat is a bit one sided towards starboard. Plus, with the filing I had to do to make it fit, I will need to repaint bits of the cockpit edges again.
As you can see, I had to use some filler on the fuselage. Again, not sure if this is a slight warp in the resin or me. However, it was not a big deal.
I have now to put some weight in the nose. Then I can start to put the details parts for the nose onto the body plus I can fit the blanking plate where the radar dustbin would have been.
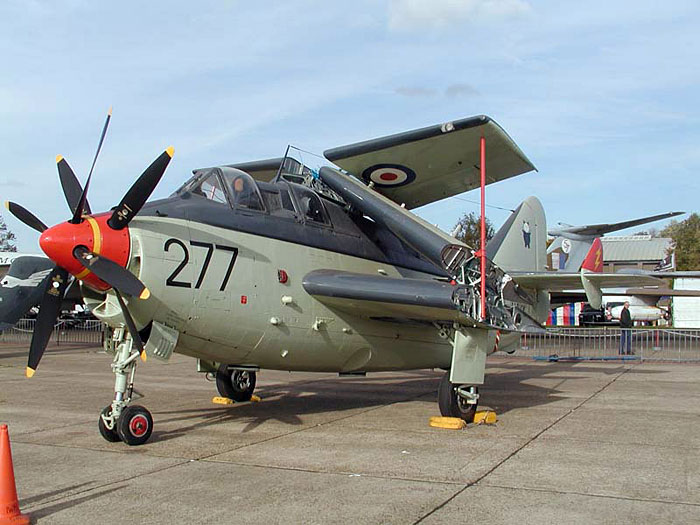
I have been looking at the wing fold and managed to persuade myself that I could go ahead with that, and if it didn't work out, come back to the straight wings. However, because of the inaccessibility of the inner parts of the wing surfaces, once the wings are folded (see image - courtesy of Hyperscale),
I would have to paint and decal the wing before I attempted to put it together. That rather makes it a big commitment and, as some decalling is required, there would be no coming back without getting a replacement decal sheet. However, at the moment, I am minded to go on with the wing fold. It will make it a much more interesting model.


As you can see, I had to use some filler on the fuselage. Again, not sure if this is a slight warp in the resin or me. However, it was not a big deal.
I have now to put some weight in the nose. Then I can start to put the details parts for the nose onto the body plus I can fit the blanking plate where the radar dustbin would have been.
I have been looking at the wing fold and managed to persuade myself that I could go ahead with that, and if it didn't work out, come back to the straight wings. However, because of the inaccessibility of the inner parts of the wing surfaces, once the wings are folded (see image - courtesy of Hyperscale),


Monday, October 31, 2011
The Gannet gets a cockpit
BTW, I would really like some feedback so if you think of any suggestions or thoughts, please leave a comment. However, if you can't be constructive, please don't be offensive.
Please remember that this is a 1/72nd scale model and that the pictures on here are 200% life size so expect it to look a bit gritty. However, it is proving to be quite enjoyable. I have broken one piece of resin (the base of the seat for the Radar operator at the back. The block underneath was too high for the seat to fit under the headrest so in cutting it back, I smashed the seat. I have painted it as if it was there and and I am sure that, once the canopy is on, you will not be able to see it. There really is a difference between the Pilot and Radar op. seats against the Navigator - he didn't get a leather back to his seat - the other two have a red/brown back but not him!
The seat belts are just Tamiya masking tape painted and cut to size; then a touch of silver for the buckles. Again, this is 1/72nd!


The white is the residue left from the accelerator that I used to speed up fixing the rear cockpit as it wouldn't stay in place.

Sunday, October 30, 2011
What a nice kit this Gannet is
I spent Friday afternoon and evening removing all of the main Gannet parts from their moulding blocks and cleaning them up. Then, this morning, following instructions from Ken, I gave everything a dose down with Cillit Bang degreaser with a good scrub with a tooth brush.

This gets rid of all of the release agents, etc. that get onto the surface of the resin and stop glue and paint from adhering.
The small parts are wonderfully moulded and were extremely easy to clean up. Here is a shot of all of the parts for the fuselage. I am very impressed both with the detail and with the fit of the parts.


I am going to give everything a coat of primer later today. Because I have had such good results with it, I am going to make that first coat one of black primer. This will suit the cockpit and the upper surfaces. I will then use it as pre-shading for the lower half of the body, which is going to be in Sky - 'Duck Egg Blue' - 'Duck Egg Green' as it is variously called. I will put some more shots up when I have done that.
I am still wary of the gluing up process as you all know my love of super glue. However, the Gator's Grip is a quick grip, slow cure, acrylic glue and will be better for gluing the major components together. I just need to be patient. This is why I am doing this alongside the Admiral Seafire -so that I have something else to do whilst the glue sets.
You may well ask 'where are the wings'. Well, as I have mentioned, I have the wing fold set. This is a complete replacement for the deployed wings that come with the kit. However, it is very complex so I am keeping my options open on this.
Friday, October 28, 2011
I must be mad but here goes!
Having ranted and raved and cursed about resin over the last couple of years and vowing to avoid all kits that have it in their make up, what am I doing? Well, just a Czech Master Resin Gannet COD.
The COD was the final version of the Gannet and was just an slightly emptied out airframe for use as a communications aircraft - COD standing for Carrier Onboard Delivery. There are a few injection Gannets around - Frog, Trumpeter and Revell, but they are all either AS1/4s or T1/2. there is not an injection COD, nor is there an injection AEW3.
My good friend Ken has persuaded me to have a go at both of these. As you know I have a soft spot for Gannets so I would like to have all 4 types in my FAA collection.
I am currently working on the Admiral Seafire 46 which is coming on nicely but I need something in between paint coats. Here are a couple of pictures of the kit out of the box. As you can see, it is very nicely moulded and has very little flash. The moulding blocks on the fuselage are nicely handled. I haven't opened the other bags yet but I am assured that this will go together nicely. I have a bottle of Gator's Grip so I shouldn't need to use Super Glue for the main parts - Gator's Grip, masking tape and patience will be the order of the day.
Oh, did I mention that I was not only supplied with the Gannet as a kind gesture, but also the wing fold! I was a bit concerned about this but the wing fold set comes with replacement wings so I don't have to do a cut and paste job, thank goodness. Must get the decals right though - unlike a famous one in the magazines.


Monday, October 24, 2011
This Seafire is fun
Having had such heart aches and trials over the Eduard Tempest, I sort of assumed that the Admiral Seafire 46 was going to be much the same. However, I am finding it great fun. Why is that?
Firstly, it doesn't rely on lots of etched and resin for its details - what detail it has is all plastic - except for the seat belts. Secondly, the plastic is quite soft so sanding everything to fit isn't too big a chore. So, I have found myself spending hours putting together one of the smallest aircraft I have built since I did the two Salamanders.
The plastic all needs a bit of clean up and fettling to fit but generally, as you can see, it makes it without filler - except for one wing join. The cockpit has come out quite well. However, the headrest didn't appear to be there in spite of being in the drawing, so I had to make one.
For some time I thought I had lost the decals and was contemplating a Model Alliance set - almost the price of the kit, but I finally found them - in my tool box!
Here is where we are to date.


Sunday, October 23, 2011
Eduard Tempest finally finished - I am happy, anyway
Well here we are - I thought I would never do it but it is finally finished. I have gone for pristine rather than weathered on the basis that it is fine like this and the potential for screwing up is great so I left it!
Comments? Well, I didn't use much of the etched brass - the seat belts and the UC doors mainly. The resin cockpit was a complete waste of time. I didn't realise that there was a plastic one in the box or I would have used that - not that you can see anything of the cockpit, as my shot of the seat shows. I lost the tail wheel so I had to make one up. It came from the back end of the propeller shaft plus an unused piece of etched from the kit. It's a bit low but it is there so not to worry.
The basis of the decoration is Pierre Clostermann, No. 3 Squadron, RAF Fassberg Germany July-August 1945. I really wanted to do Roland Beaumont but was scared off by the D-Day stripes. Now I know that I can do this without etched and resin, I will maybe have another go some time.


Fantastic extra book for my Fleet Air Arm Project
My friend Ken put me on to this one. Cheap at £40 on Amazon but -Wow - what contents.
The book is "Fleet Air Arm Fixed-Wing Aircraft since 1946" by Ray Sturtivant.

This book has 640 pages and covers every single aircraft that flew with the FAA - that's right - aircraft - NOT aircraft type! Every aircraft is listed under its FAA serial along with a description of all known activity. It doesn't show standard flights but does show any incident - from a wing hitting something on taxi through to complete write offs.
It is loaded with black and white photos and has a colour section in the middle which gives basic colour layouts for most of the aircraft included.
Lastly, it has a list at the back of every pilot that flew with the FAA with a listing of the aircraft flown.
This has enabled me to finally track down what happened to my scouting friend - John Sillett. He is listed as flying the following aircraft - all AEW3 Gannets: XG786, XG885, XL450, XL473, XL482 and XL493. The incident that I remember John telling me about is listed as follows: "Night GCA approach, std engine failed, prop failed to feather, ditched port beam of Eagle near Singapore (Lt. JM Sillett & Lt. BM Jackson-Dooley unhurt). So now I know.
Also, I was interested in the expression std (starboard) engine in an aircraft that looks as though it only has one engine. However, the 'Double Mamba' engine was arranged with two engines side by side driving contra-rotating propellers so it actually does have a starboard and a port engine!
The book is not competition for the Ray Williams book mentioned in an earlier blog. That has much more detail about the aircraft type - but put together, I think I will be able to do a good job on the project. Incidentally, it lists 55 aircraft types, where the Ray Williams book only lists 44.
Saturday, October 22, 2011
Starting on my Fleet Air Arm theme
I have listed out pretty much all of the aircraft that I can get and have been acquiring some of them in readyness - suddenly I have a stash!
This is going to be some ride as I am moving out of my comfort zone in many ways with this. So many of the aircraft can only be found in 1/72 and so many of them are short run or even (don't say it too loud) resin kits!
This all came about because I finally found out the details of my old Scouting friend, John Sillett's crash when flying a Gannet AEW3. In conversations with Ken Withey, I suddenly had committed to building not only an AlleyCat AEW3 but also a CzechMaster AS/4 COD - oh dear :-(
So I have to start somewhere, and in my enthusiasm, I have left the Lightning a little unfinished and the Eduard Tempest just needing a flat coat and the wheels + radio aerial fitted. I will sort that out tomorrow.
In the meantime, I am making these FAA models in date order to avoid doing all the ones I like first. Hence, I have started on the following:
 This is distictly a short run kit - no alignment pins or tabs, rotten instructions and some flash. However, I have persevered and this is where I am at the moment:

 The scalpel handle is marked in millimetres and centimetres so you can see the size!
Next step is to fit it into the fuselage - now that might be fun. Some pics later if I get it done.
This is going to be some ride as I am moving out of my comfort zone in many ways with this. So many of the aircraft can only be found in 1/72 and so many of them are short run or even (don't say it too loud) resin kits!
This all came about because I finally found out the details of my old Scouting friend, John Sillett's crash when flying a Gannet AEW3. In conversations with Ken Withey, I suddenly had committed to building not only an AlleyCat AEW3 but also a CzechMaster AS/4 COD - oh dear :-(
So I have to start somewhere, and in my enthusiasm, I have left the Lightning a little unfinished and the Eduard Tempest just needing a flat coat and the wheels + radio aerial fitted. I will sort that out tomorrow.
In the meantime, I am making these FAA models in date order to avoid doing all the ones I like first. Hence, I have started on the following:


Next step is to fit it into the fuselage - now that might be fun. Some pics later if I get it done.
Wednesday, October 19, 2011
The Tempest moves on
Actually, it is not looking too bad now. I have given it some camo and have put the decals on.
Here it is for all to see:


I am working on the canopy and the propeller/boss at the moment. After that, I am left with the wheels and doors plus the radio aerial and I should be finished - oh after I gove it a coat of flat varnish - BEFORE I fit the canopy
Here it is for all to see:


I am working on the canopy and the propeller/boss at the moment. After that, I am left with the wheels and doors plus the radio aerial and I should be finished - oh after I gove it a coat of flat varnish - BEFORE I fit the canopy
Saturday, October 15, 2011
Finally - a proper project
Some years ago I put a list up on a newsgroup suggesting that it was the sum total of aircraft used by the Fleet Air Arm since 1945. I was quickly disabused of my ideas and given the real list - much longer. I then purchased 'Royal Navy Aircraft Since 1945' by Ray Williams. This lists 44 aircraft.

I have gone through the list and have come up with all those that I can find as currently available in 1/72nd. I now propose to work through the list and end up with a definitive set of models.
Here is the current list (with some gaps noted) along with their kit numbers and mask/decals required.
I cannot believe that I cannot find any currently available kit for a Westland Whirlwind or Dragonfly helicopters - Kingkit, Kit Krazy, EBay - NOTHING!

I have gone through the list and have come up with all those that I can find as currently available in 1/72nd. I now propose to work through the list and end up with a definitive set of models.
Here is the current list (with some gaps noted) along with their kit numbers and mask/decals required.
| Aircraft | Date of 1st Service | Kit | Extras |
| Blackburn Firebrand | 1945 | VAL72006 | |
| D.H. Sea Hornet 20/22 | 1947 | SH72057 | |
| Fairey Firefly FR47 | 1947 | ||
| Hawker Sea Fury | 1947 | TU01631 | EDCX199 |
| Supermarine Seafire 46 | 1947 | ADM7205 | |
| D.H. Sea Vampire | 1948 | CMR1219 | |
| D.H. Sea Hornet 21 | 1949 | SH72059 | |
| Douglas Skyraider | 1951 | MAG7224 | |
| Supermarine Attacker F1 | 1951 | AZM72082 | |
| Westland Whirlwind | 1952 | ||
| Grumman Avenger | 1953 | AC1651 | X72108 |
| Hawker Sea Hawk | 1953 | HB87251 | EDCX290 |
| Sikorsky Dragon Fly | 1953 | ||
| Supermarine Attacker FB2 | 1953 | AZM72083 | |
| D.H. Sea Venom | 1954 | EA72225 | |
| Fairey Gannet AS1/4 | 1954 | TU01629 | EDCX178 |
| Westland Wyvern | 1954 | TU01619 | EDCX058 |
| Short Seamew | 1957 | MAG7205 | |
| Hawker Hunter T8 | 1958 | OLPR7250 | |
| Supermarine Scimitar | 1958 | XK72011 | |
| D.H. Sea Vixen | 1960 | CH5051 | |
| Fairey Gannet AEW3 | 1960 | ACRK7201 | |
| Fairey Gannet COD | 1961 | CMR1118 | |
| Westland Wessex | 1961 | ARK72032 | |
| Blackburn Buccaneer | 1962 | AX04049 | EDCX280 |
| Hawker Hunter GAII | 1962 | ||
| Westland Wasp | 1964 | ||
| McDonnell Douglas Phantom FG1 | 1969 | FJ270449 | |
| Westland Gazelle | 1974 | AX50084 | MD026 |
| Westland Sea King HAS2 | 1976 | AX04048 | |
| Westland Sea King HAR5 | 1977 | AX50113 | |
| Bae Sea Harrier FRS1 | 1980 | AX03078 | EDCX259 |
| Bae Sea Harrier FRS2 | 1981 | AX03079 | |
| Westland Lynx HAS2 | 1981 | HB87236 | EDCX243 |
| Westland Lynx HAS3 | 1982 | HB87237 |
I cannot believe that I cannot find any currently available kit for a Westland Whirlwind or Dragonfly helicopters - Kingkit, Kit Krazy, EBay - NOTHING!
Subscribe to:
Posts (Atom)