Tuesday, November 22, 2011

Wrap up on the Avenger and progress on others

The Avenger is finished. It has had its final satin coat of varnish.

Last details

Radio aerials are Aeroclub stretchy thread with a sweep of dark blue on it. I drilled a couple of holes and put 0.2mm brass wire in to set the attachment points.

The canopy was lined out using the technique described in an earlier blog - clear decal painted up and Kleared. I didn't cut it thin enough so it looks a little bulky but it worked a treat - especially on a complicated canopy like this one.


AZ Models Attacker
This is an interesting build. The moulds are short run and are quite nicely presented in terms of panel lines etc. Its just that everything needs that bit of fettling to make the parts fit together. Still that's the fun of a short run kit.

I have got it to the point where it has had the underneath and sides done in Sky and I have masked it up ready for the top coat of EDSG.
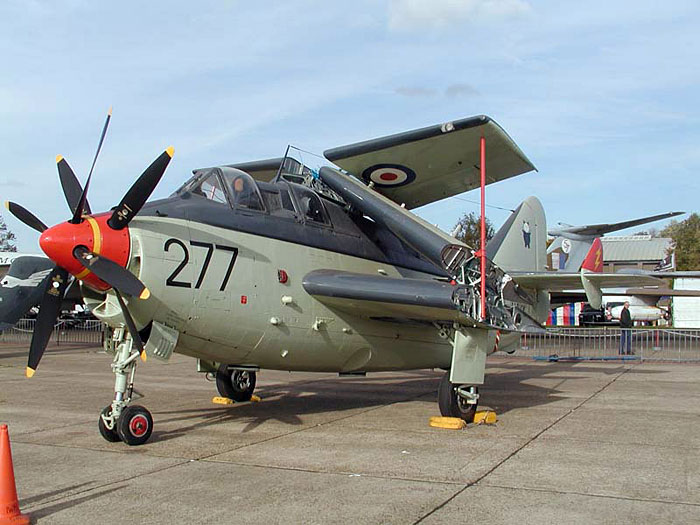

CMR COD Gannet
After painting it up with Xtracolor RAF Blue Grey, I felt that it didn't look any different from Gloss Sea Blue. Plus I was not happy using enamels after all these years. So, after due warning from Ken that I would have some problems, I gave it a coat of Vallejo Polyurethane White and then mixed up some Gloss Sea Blue and  some XA1139 Light Grey to a blend that looked right to me and the swatches I was seeing on the web. I am quite happy with the result. I did manage to save some of the mix for touching up - amazing that I remembered to do that!


This has now had a coat of Klear and is ready for some decalling.

Thursday, November 17, 2011

New Canopy Framing process

This has been passed onto me by my friend Ken. here goes -

Start off with a sheet of clear decal paper.
1. Give it a coat of Future/Klear/Pledge MSW (referred to as Klear from now on).
2. Spray it with the interior colour of the framing.
3. Spray it with the exterior colour of the aircraft.
4. Give it another coat of Klear.
5. Trim it into strips of appropriate thickness.
6. Apply the decal in the normal way.

I am actually going to apply the decal onto a wet layer of Klear rather than using MSSET.

This will take place on my Avenger in the next couple of days so - Watch This Space!

The RN Avenger AS-4 is close to being finished - and no dramas

The following is the Academy Avenger, with small modifications to the body - namely replacing the bulged windows with flat ones and the removal of another small window on either side, which can be made to look like a 1950's RN Avenger. The big addition, however, is the ASH radar under the starboard wing.

I picked up the Quickboost ASH radar resin part but this does not come with any mounting point. This is because this item was fitted to a range of aircraft in differing positions so a single mount would not be appropriate. Using a photo I had to hand of an AS-4 at the time of Suez, I was able to calculate the size and cut out a plastic card version of the mount.

All that is left to do is to give the model as it exists a coat of satin varnish, paint the framing on the canopy and put it all together.  A couple of comments here - 1. I am using satin varnish as the consensus seems to be that gloss is too bright for 1/72. I will make my mind up when I see the final version - and 2. I am using a new technique to frame the canopy which I will describe in theory in the next Blog entry and then report on the practice later.


Proof of time travel

Here is the background and then my theory.

Often when you are modelling, you drop a part on the floor - well I do it all the time!

I am sure that you have all observed that to go looking for a small part immediately is often a waste of time. Give it a few minutes and there it is. Now, my wife has theories about this, mostly to do with impatience and incompetent looking.

My theory is this. We can prove the existence of time travel by the process described above. What actually happens is that, by falling off the table - along with the plastic content of the part, the likelihood of being able to replace it if lost, and the correlation of the plastic colour with that of the floor covering - the part will actually disappear - albeit, just a few minutes but none the less disappear. This is proven by the fact that the part will not be visible for that few minutes.

My theory is that the part is actually travelling through time and will just re-appear once we catch up with it. There can be no other rationalisation!

QED!

The Seafire 46 is finished BUT!

I have finished the Admiral Seafire 46 with a single exception - I can't find the canopy! Why is there always something that goes wrong?

However, I am going to beg the big H, on my next wholesale order, for a replacement. Maybe they will and maybe they won't. I am not keen on buying a whole new kit just for the canopy. I have one other game plan ready - wait a couple of weeks and it may turn up. I will post a blog entry about my time travel theories and how model making proves that it exists.

Anyway, here it is. I have to say that, in spite of some of the problems, like losing the undercarriage doors and the tail wheel, I quite enjoyed making this kit. I don't think it looks too bad.

(Don't forget, you can see a bigger version of each photo by double clicking - a pop up window will open)


Sunday, November 13, 2011

Undercarriage door replacement

I managed to lose three of the undercarriage doors so I have to make some replacements.

The door attached to the port undercarriage strut was easy because I had the starboard one to use as a template. The two outer doors were a different matter because I have lost both of them!

Photoshop to the rescue. On the back of the box, there is a drawing of the underneath to show decal placement. It has the outline of the doors drawn in. However, it is not to scale.

I scanned the box into Photoshop and measured the box wing dimension and the model dimension. I determined that the box art had to be scaled by 175.61%to get it to the size of the model.

Here is the before and after. Making the doors should now be easy.

Saturday, November 05, 2011

The Gannet gets its first coat of primer

As CODs were painted in a dark grey blue, I have given the fuselage and the wings a first coat of my favourite primer - Vallejo Polyurethane Black. As usual, this has brought out th areas where the filling might not be as good as it should be.

Some great news though. In looking up the aircraft as supplied in the CMR kit, I find that the COD Gannet that is depicted in the kit was actually flown by my old scouting contact - John Sillett. It seems that he had a panel blow off whilst flying it. This means that, given that the Alley Cat decals have one of his AEW3s on the sheet, I will end up making models of two aircraft that he flew. Not a bad tally given that he is only recorded as flying 5 Gannets in total.

Here are the pics of the current state of play. As you can see, with total disregard to my sanity, I have gone for the wing fold option!


Guess I need to do a bit more work in this seam!

These are the rest of the wing fold. As the middle parts will have some decals on, these all have to be painted and decalled before I can put the wing fold together.

Friday, November 04, 2011

A little bit of filler goes a long way!

I have put the two fuselage halves of the Gannet together. Unfortunately, I have got the cockpit sitting a bit wrong so the Navigator's seat is a bit one sided towards starboard. Plus, with the filing I had to do to make it fit, I will need to repaint bits of the cockpit edges again.

As you can see, I had to use some filler on the fuselage. Again, not sure if this is a slight warp in the resin or me. However, it was not a big deal.

I have now to put some weight in the nose. Then I can start to put the details parts for the nose onto the body plus I can fit the blanking plate where the radar dustbin would have been.

I have been looking at the wing fold and managed to persuade myself that I could go ahead with that, and if it didn't work out, come back to the straight wings. However, because of the inaccessibility of the inner parts of the wing surfaces, once the wings are folded (see image - courtesy of Hyperscale),

I would have to paint and decal the wing before I attempted to put it together. That rather makes it a big commitment and, as some decalling is required, there would be no coming back without getting a replacement decal sheet.  However, at the moment, I am minded to go on with the wing fold. It will make it a much more interesting model.