Here is the result. This should look fantastic when it has a few coats of Johnsons Klear on it.


| Stash | ||||
| Make | Code | Description | Scale | Quantity |
| Fly | FLY7200 | A/W Whitley Mk V - Vingtor BOAC decals | 1/72 | 1 |
| F-Rsin Plastic | FRP4033 | CV-990 Garuda - Left over from SBX | 1/144 | 1 |
| Eduard | ED1172 | NATO Falcons - Academy F-16 + Resin etc | 1/48 | 1 |
| Eduard | ED1170 | P-38J over Europe - Academy P-38J + Resen etc. | 1/48 | 1 |
| Airfix | AX04049 | HS Buccaneer - FAA | 1/72 | 1 |
| Trumpeter | TU01629 | Fairey Gannet AS. Mk 1/4 - FAA | 1/72 | 2 |
| Trumpeter | TU01630 | Fairey Gannet T.Mk 2 - FAA | 1/72 | 1 |
| Tasca | TAS2400 | Pz,Kpfw.II Ausf. F - | 1/24 | 1 |
| Special Hobby | SH72066 | Fairey Firefly TT Mk.4 - FAA | 1/72 | 1 |
| Eduard | ED7078 | Grumman Hellcat Mk.I/Mk.II Combo FAA | 1/72 | 1 |
| Perry Miniatur | PMBH80 | British Napoleonc Hussars 1808- 1815 | 28mm | 1 |
| Special Hobby | SH72036 | Sikorsky HO3-S1 - FAA - Westland Wessex | 1/72 | 1 |
| HobbyBoss | HB87251 | Hawker Sea Hawk FGA.6 - FAA | 1/72 | 1 |
| Admiral | ADM720 | Supermarine Seafire F.45 - FAA | 1/72 | 1 |
| Ark Models | ARK7203 | Westland Wessex HAS Mk.1 - FAA | 1/72 | 1 |
| Airfix | AX02022 | Douglas Dauntless - Left over from SBX | 1/72 | 1 |
| MiniArt | MT35071 | British Desert Tank Riders - For Valentine | 1/35 | 1 |
| CzechMaster R | CMR146 | Bristol Sycamore - FAA Resin | 1/72 | 1 |
| CzechMaster R | CMR231 | De Havilland Sea Venom - FAA Resin | 1/72 | 1 |
| EBRO | EMSF1 | Team Lotus 72C Gold Leaf - | 1/20 | 1 |
| AZ Model | AZM7282 | Supermarine Attacker F.1 - FAA | 1/72 | 1 |
| Work In Progress | ||||
| Revell | RV07089 | 2010 Shelby Mustang GT500 - | 1/12 | 1 |
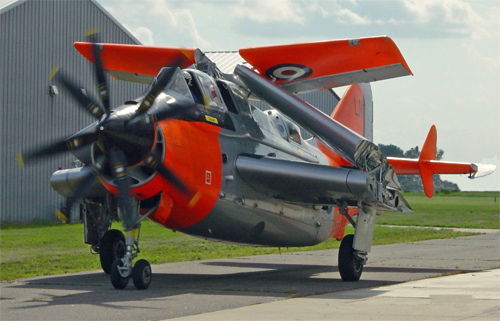
| CzechMaster R | CMR118 | Fairey Gannet COD - FAA Resin + Wingfold | 1/72 | 1 |
| Alley Cat | ACRK720 | Fairey Gannet AEW. Mk.3 - FAA Resin | 1/72 | 1 |
| AFV Club | AF35185 | Valentine Mk II - | 1/35 | 1 |


