I have just realised that it has been nearly 8 months since I last posted to this blog. During a lot of that time I was taking medication which left me in a state that wasn't conducive to slow, careful work. I spent a lot of time sitting down reading and napping. That's all in the past now and I am getting back into the swing of things.
I have spent a good bit of time recently on starting up an HO scale (3.5mm to the foot) American style model railroad - see my railroad blog at Gentle Model Railways. However, I was determined to get back to modelling so that I could take something new to the Clacton club in January.
One of the other reasons that I stopped modelling for a while was that I couldn't get my airbrush to behave. I messed up a nice NATO F-16 which got thrown away in the end. I also spent some time on 1/144th scale aircraft but the RAF Tornado that I built wasn't very well moulded so I lost interest there. I have now got a full cleaning kit for my airbrush so, once I have finished the current project, I will clean it up and get on with an aircraft again.
The current project is a Young Miniatures bust. I really like these and have had some good results in the past; not up to Geoff Woods standards but good enough for me. The one I am working on is a 92nd Gordon Highlander from the Battle of Waterloo, 1815. With decoration as fiddly as this, I spend my time touching up the red and then finding that I need to touch up the white. Once I have done the white, I have to touch up the red again, and so on! It isn't finished yet and these things always look worse when blown up but this is where I have got to.
My next task, and the one I always dread, is to paint his face. Then I have to do the tartan but I did that once before with my Crimean 71st Highlanders Officer so I should be alright with that.
More to come!
I make a range of models from 1/12th scale cars down to 144th scale aircraft. I also paint a range of figurines from 54mm up to 1/10th scale busts. Don't expect too much super detailing - I am pretty much an out of the box modeller.
Thursday, December 18, 2014
Friday, April 04, 2014
One finished for the Clacton Club
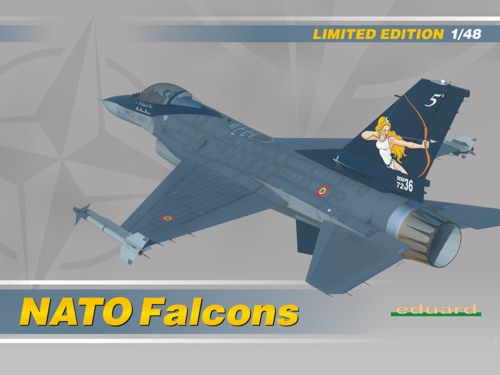
I had a plan – I have an Eduard limited edition NATO Viper that I was going to finish for Clacton. However, it is a very complex kit and I got as far as the baseline painting. I realised that I wouldn’t finish it in time so I broke out the BOAC Whitley that just needs some undercarriage and props.
Well, that idea went down the toilet when I saw that the undercarriage struts were broken. The side struts are OK but on both units, the joining bars between the struts were cracked separated from those struts. I can probably repair these using brass and poly rods but, again, there wasn’t enough time.
So, I did what I always do in the circumstances. I pulled out a 1/144th scale kit and got that together with 30 minutes to spare on Thursday night. The kit I chose was an Academy Panavia Tornado. The kit colours are for the Gulf War (the first one, that is). I had already got hold of a pot of Xtracrylix Desert Pink so I was ready.
Here it is. The kit hasn’t too much detail. I made the usual silly – I lost one of the nose wheels so I had to cut a piece of sprue and file it to thickness.
So, what else went wrong? I put the wings in upside down. I forgot to add any nose weight. So, the body got split apart. The liquid lead was a bit too proud so I had to get the Dremel out to grind the lead down. Along the way, I cut the edges of the fuselage so that needed a lot of filler to sort out. I left the wings able to swing but realised that this wasn’t a good idea. On the real aircraft, the weapons swing with the wings but on the model… no chance. So swinging the wings would leave the weapons looking ridiculous. I glued them in a landing configuration.As I was late in finishing, I wasn’t sure that the undercarriage was strong enough to hold up, given the lead in the nose so I took a spare Revell 1/144th stand and mounted it on that. It’s OK but I really must put some effort into finishing a decent model for the club.
Wednesday, March 12, 2014
I will come back to the Wessex but for now...
I am getting going on a fantastic kit that I bought just before we closed SBX.
This is the Eduard 1/48th scale NATO Falcons limited edition.
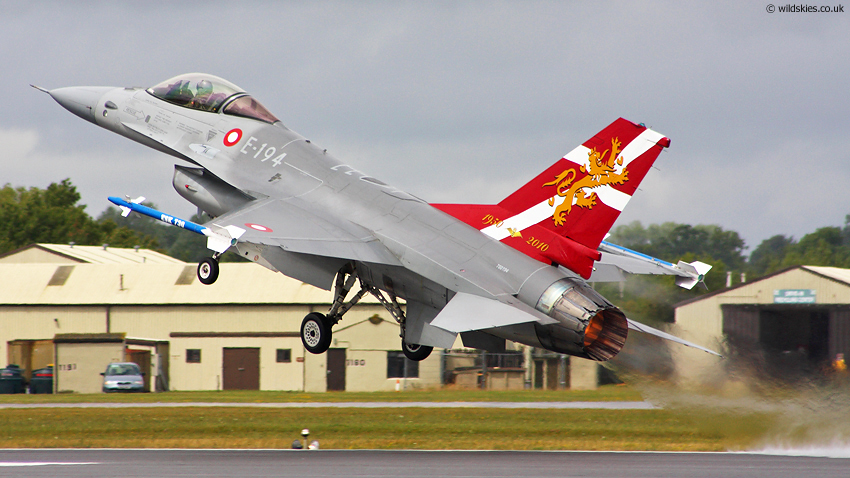
This is the Kinetic kit for the F-16AM as used by the Norwegian, Danish, Dutch and Italian air forces. I am making the Danish AM Block 10 version from ESK370 squadron.
The actual aircraft that I am building is this one:
This is the Eduard 1/48th scale NATO Falcons limited edition.
This is the Kinetic kit for the F-16AM as used by the Norwegian, Danish, Dutch and Italian air forces. I am making the Danish AM Block 10 version from ESK370 squadron.
The actual aircraft that I am building is this one:
(Photo courtesy of Wildskies.co.uk)
The kit comes with two sheets of Eduard etched brass - one coloured and one plain, a pack of Eduard Brassin resin parts including the bang seat and a paint mask. The decal sheet is extremely detailed.
I have decided that I now have the time to do this properly so I am carefully using all of the etched that I can sensibly add. here is the cockpit.
More images as I get further along.
Sunday, February 23, 2014
Two more completed - 1/144th Typhoon and another 1/10th bust
So, my little 1/144th scale Typhoon is finished. It can sit alongside the other 1/144th models that I have - 4 in total now - but with a good few more in the pipeline.
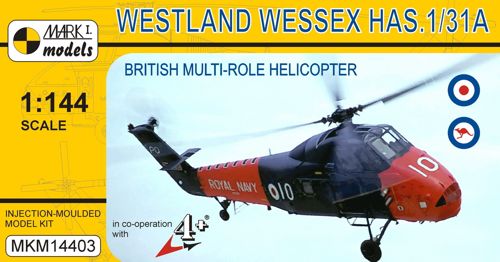
Next up is 1 1/144th Westland Wessex HAS 1 (see below)
I have also fished the Afrika Korps Luftwaffe Pilot. I am quite pleased with this but I think that the face is a bit pale. The box art shows him this was, so I can only assume that he has just arrive in Africa.
I am pleased with the shading and especially pleased with the compass hanging from his life jacket. I did try to make a decal for this (as none is provided in the kit) but, in the end, I hand painted it.
Here is the Wessex.
As you can see, it is quite small and has needed a good bit of filler. It will be getting its first coat of primer tomorrow so more pictures then.
Saturday, January 25, 2014
Progress on the Luftwaffe Afrika Korps Pilot and other things
Firstly, I am not getting on too well with the Whitley. I am currently working on tidying up the camouflage before I put the decals on. The dividing line between the upper side and the aluminium underneath is proving a bit tricky around the engine nacelles.
I am getting on quite well with the Luftwaffe pilot but have reached the point where I always have difficulty - the face. Anyway, this is where I am with it.
The body is pretty much finished. The forage cap is nearly done - just a little more touching up. I have the goggles to complete and then... the face! The face has had some pre-shading and now has its first overcoat. Some way to go though!
My other little project is following on from recent completions. I seem to have got it in my head to have a go at some 1/144th aircraft. I have done a few before and I quite like the fact that they can be competed quite quickly. The current project is a Revell Miniwings 1/144th Hawker Typhoon Mk1. I know that I have just finished the Airfix 1/72nd scale version but I have had this since before Modelzone shut down (one of my few purchases from that store).
You can see how small it is up against the pencil.
Tuesday, January 14, 2014
Whitley camo finished
Well, here is the Whitley with its dual colour camouflage finished. I now need to give it a coat of Johnson's Klear to fix the paint and then I can mask it up to spray the underside in Alclad natural aluminium. That will need a coat of matt black first as that always makes Alclad shine better.
Monday, January 13, 2014
Back to the Whitley
I have been getting on with the Whitley. Having given the upper side a overall coat of RAF Dark Green, I have now masked off the green so that I can spray the RAF Dark Earth.
Wow, I might even get this finished before the next Clacton meeting in February!
Wow, I might even get this finished before the next Clacton meeting in February!
Wednesday, January 08, 2014
Luftwaffe Afrika Korps Pilot progress
I am working on the Young Miniatures bust of the Luftwaffe Pilot. I have given the body and the head a full base coat and have started work on the body detailing. The base colour for the shirt is Andrea Beige whilst the life jacket is Vallejo Model Color Buff. The slight differences bring out the detail on both of these items nicely. I have given it a first pass at shading and detailing. Now that I know what it really looks like - I always have difficulty seeing the detail in an undercoat - I will get on with smoothing out the shading and adding some highlights.
The shading, by the way, is Vallejo Umber Transparent Wash. This fills the dips nicely and can be blended using clean water. I am tackling the head over the next few days - gulp!
There is a compass hanging on the life jacket. In the photo on the box, this is nicely detailed. One would have hoped to get a decal for this - but no such luck. I have put one together using iDraw on my iMac. I have had to draw it very large and then reduce it for use. It is actually only 7/32" - 7mm - across on the model so I have had to simplify it.
Cutting it out and glueing it on will be a bit of a challenge!
Friday, January 03, 2014
Airfix 1/72nd Hawker Typhoon Mk 1B
Another one bites the dust. I really enjoyed making this one. These new airfix kits are really good. The instructions are clear, the painting instructions are superb and the fit is top notch.
The aircraft modelled is that flown by Squadron Leader Basil Gerald "Stapme" Stapleton DFC, No. 247 (China-British) Squadron, No. 124 Wing, 2nd Tactical Airforce, Royal Air Force, Eindhoven, Netherlands, December 1944. (Pheww, what a mouthful). It seems that this model has the updated tail planes that were not fitted until after D-Day (at least that's what Colin Ovens tells me).
The aircraft modelled is that flown by Squadron Leader Basil Gerald "Stapme" Stapleton DFC, No. 247 (China-British) Squadron, No. 124 Wing, 2nd Tactical Airforce, Royal Air Force, Eindhoven, Netherlands, December 1944. (Pheww, what a mouthful). It seems that this model has the updated tail planes that were not fitted until after D-Day (at least that's what Colin Ovens tells me).
Here is a close up of the opened weapons bay.
A funny thing occurred to me at the Clacton club last night when I was talking about the paint used. To say that I have a "catholic" taste in paint is pretty accurate as I use whatever make I have that fits. Hence, the Ocean Grey is Xtracrylix, the RAF Dark Green is Lifecolor and the Medium Sea Grey underneath is Vallejo Model Air!
I have always said that the one thing I didn't enjoy was the decalling but it seems that, since retiring, I have got over this. The decal sheet is pretty impressive. It even includes the D-Day stripes and the yellow leading edges of the wings!
Well onwards and up, as Tony Little used to say.
I am currently trying to get the Whitley painted. Now I have refurbished my Iwata TR0 with a new needle etc., I should be able to finish that. I have started on the Luftwaffe/Afrika Korps pilot, have cut all the resin moulding blocks off and given him a coat of Vallejo grey primer.
The next aircraft I am planning on starting is the great little 1/144th Westland Wessex HAS 1.
I have checked and I have the required Oxford Blue and Red so it should be an easy build.
More soon.
Subscribe to:
Posts (Atom)


